Schedule Orbital Queries
Scheduled queries are those queries that have a specific time and duration in which they are run. Once you have created the query, you will use the Schedule Orbital Query function to set the query’s duration and frequency. Duration is how long the query will be active for and frequency is how many times the query will be executed within the query’s duration. These queries are run across many to very many endpoints, any of which, at any given moment, can be taken offline.
Note: The Orbital node, installed on each endpoint, is the device that polls into the Orbital Service at predefined intervals, and/or when the node is returned on line.
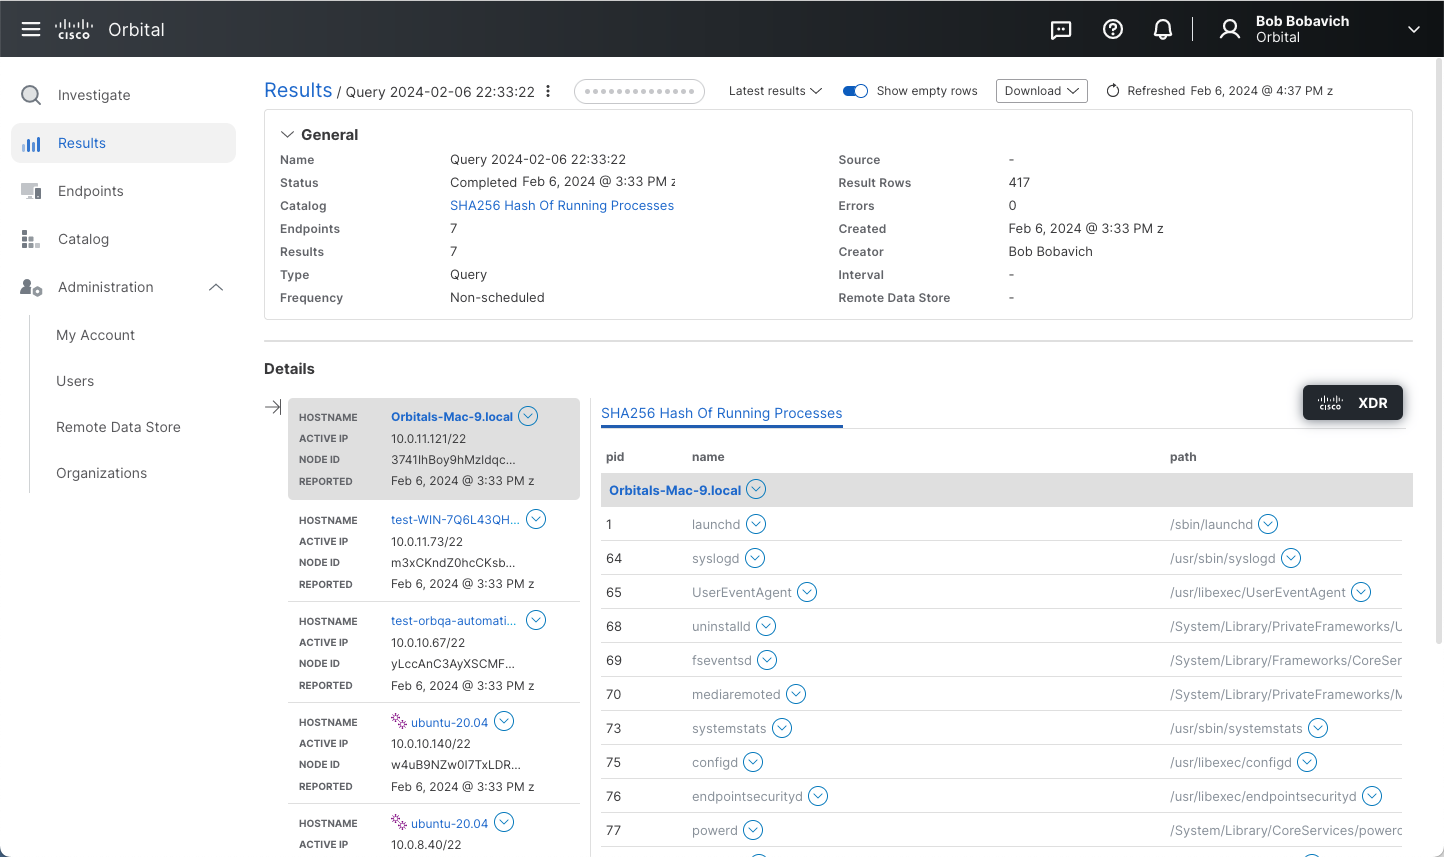
Results from Scheduled Queries can be viewed from the Results page.
Scheduled Query Behavior
Because endpoints can be taken offline and returned online at potentially random times, Orbital’s Query Scheduler cannot simply schedule a query to be run every ten minutes for a period of ten days, across all endpoints that are online at that moment.
Instead, it must make allowances for all of the nodes that are offline, or taken offline when the query is scheduled to run. In order to accommodate this, the scheduler will place the query or queries in a queue for a given node, to be run at the specified interval (e.g. every fifteen minutes). The node will retrieve and run the query at the designated interval. If the node has been taken offline before the query can be run, once it returns online, it will retrieve and run the queued query. This results in some nodes not running the query at the specified interval, but at a later time.
For example, a user creates a query that is scheduled to started at one o’clock in the afternoon, run every fifteen minutes over the course of ten days, across 100 nodes, which are running a mixture of operating systems. During the initial query run, all of the endpoints are online and successfully return the query’s results. However, during the second run, made at 1:15pm, two endpoints are offline and only return online at 1:18pm. In this instance, the two nodes, installed on the endpoints, will run the query at 1:18pm and every fifteen minutes afterwards; i.e. 1:18pm, 1:33pm, 1:48pm, etc. This three-minute offset in the query execution schedule will be in place until the query’s duration has expired. The other 98 endpoints will run at the scheduled time; i.e. 1:15pm, 1:30pm, 1:45pm, etc.
Schedule Orbital Query Popup
In order to create a scheduled query, you will need to use the Schedule Orbital Query Popup, shown in the figure below.
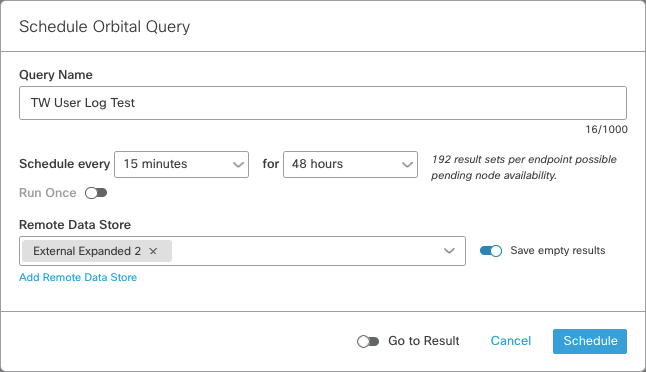
This popup window consists of the following ten user interface elements:
| Element | Description |
|---|---|
| Query Name | This field accepts the name of the scheduled query you are creating. The default value for this field is Query YYYY-MM-DD HH:MM:SS, where: |
| YYYY represents the year the query schedule is created. | |
| MM represents the month the query schedule is created. | |
| DD represents the day the query schedule is created. | |
| HH represents the hour the query schedule is created. | |
| MM represents the minute the query schedule is created. | |
| SS represents the second the query schedule is created. | |
| This field can accept up to 1,000 characters, as displayed by the character counter located under the right end of the field. | |
| Schedule every | This dropdown accepts the frequency when the query will run. This value represents time in minutes, hours, and days. |
| for | This dropdown accepts the duration over which the query will run. This value represents time in minutes, hours, days, and years. |
| Note: The number of expected result sets per endpoint is displayed to the right of the for dropdown. For example, 192 result sets per endpoint possible pending node availability. | |
| Run Once | This toggleswitch is used to tell Orbital to run the query being scheduled only once over the subsequent 24 hours. Selecting this toggleswitch will tell Orbital to ignore the values placed in the Schedule every and for dropdowns and deactivate the dropdowns. |
This behaves like a compromise between Scheduled query and a Live query. Orbital’s query api allows you the same functionality by specifying a zero (0) value for the interval parameter. For more information on the interval parameter, refer to Interval in the Query API topic. Refer to the Remote Data Store Errors section in the Remote Data Store topic for more information on Remote Data Store Errors. |
|
| Note: The Run Once toggleswitch can also be found beside the Default Query Schedule dropdowns in the Query Settings section of the My Account tab located on the Settings page. The functionality of this toggleswitch is the same as on the Schedule Orbital Query Popup. | |
| Remote Data Store | The remote data store is the location where your saved query results will be sent, if set. This dropdown allows you to choose one or more remote data store sources from the dropdown list. Refer to Multiple Data Store Sources for more information on multiple data stores. Also, refer to Managing Your Remote Data Storage Definitions for more information on adding a new remote data store to the dropdown list. |
| Note: If you have set a default remote data store, it will be automatically populate the Remote Data Store dropdown on the Schedule Orbital Query popup. | |
| Save empty results | Selecting this toggleswitch tells Orbital to keep all of the results returned from the Orbital nodes, even if they do not contain any values. |
| Note: This toggle switch will not be displayed if you have not selected at lease one remote data store for the results to be sent to from the Remote Data Store dropdown. | |
| Add Remote Data Store | This link is used to add a new remote data store to the list, if the required data store is not listed. Clicking on this link will take you to the Remote Data Stores tab of the Settings page. Refer to Adding a Remote Data Store for more information on adding a new remote data store to Orbital. |
| Go to Result | Selecting this toggleswitch will display the Result page after Schedule has been clicked. |
| Schedule | Clicking Schedule will save the scheduled query and begin its execution. The results are listed on the Query Results page. |
| Cancel | Clicking Cancel will clear the scheduled query parameters and remove the Schedule Orbital Query popup from the screen. |
Multiple Data Store Sources
Orbital allows you to select multiple data store sources where the results from the scheduled query will be sent. The figure below illustrates how the Remote Data Store dropdown field looks where there are more than one remote data store has been selected.

Refer to How to Select Multiple Remote Data Stores for more information on using the Multiple Data Store Sources feature.
How to Schedule a Query
Once you create a query that works for you, you can schedule it to run on a regular basis. Queries can be run on the fly as temporary live queries, or you can create and schedule queries to run on a regularly scheduled basis, with the results sent to an application or data store of your choice. The schedule increments run from 5 minutes to 30 days. For example, you can schedule a job to run every 5 minutes for 72 hours; or every 24 hours minutes for 72 hours (that is, once a day for 3 days).
-
Create the query you want to have run on a scheduled basis and click Schedule Query. The Schedule Orbital Query popup window opens, as shown in the figure below.
Note: The default schedule is to run the job once in 24 hours.
-
Define the query’s schedule by providing the parameters for the following popup elements.
-
Type the name of the query in the Query Name field. This is the name of the query’s schedule that will be listed in the Results page. You do not have to provide a name to the query’s schedule. If you wish, you can choose to use the default schedule name.
-
Set the query schedule’s frequency using the Schedule every dropdown. Click the down arrow on the right side of the Schedule every dropdown, then select the appropriate value. Refer to the top paragraph of this topic for a definition of frequency. Refer to the Schedule every element definition in the User Interface Elements table for a description of the user interface element.
-
Set the query schedule’s duration using the for dropdown. Click the down arrow on the right side of the for dropdown, then select the appropriate value. Refer to the top paragraph of this topic for a definition of duration. Refer to the for element definition in the User Interface Elements table for a description of the user interface element.
-
Select the Run Once toggleswitch if you wish to have the query’s schedule run once in the next 24 hours. Selecting this toggleswitch will cancel any values you set for the Schedule every and for dropdowns.
-
Us the Remote Data Store dropdown to select the remote data store source where the query’s results will be sent during its run. If you wish to select more than one remote data store sources, refer to the How to Select Multiple Remote Data Stores section below. Also, refer to the Remote Data Store Errors section in the Remote Data Store topic for more information on Remote Data Store Errors.
-
Select the Save empty results toggleswitch if you wish to include query results where the endpoint has not returned any result values.
-
Use the Add Remote Data Store link to add a new remote data store, if the data store or stores you need are not listed in the Remote Data Store dropdown. Clicking this link will open the Settings page and display the Remote Data Stores tab. Refer to Remote Data Stores for more information on the Remote Data Stores tab.
-
Selecting the Go to Result toggleswitch will redirect you to the Results page (shown in the figure below) and display the query’s results for that job once you have started the query’s run. This has the benefit of immediately viewing the results instead of having to migrate to the Results page, then find and select the results from the list of jobs.
-
-
Start or abandon the query’s schedule.
- Click Schedule to begin running the query’s schedule. Clicking this button with remove the Schedule Orbital Query popup from the screen and start the query. Once you have started the query, you can see it listed on the Results page.
or
- Click Cancel to abandon the query’s schedule. Clicking this button will remove the Schedule Orbital Query popup from the screen and discard any parameters you might have set.
How to Select Multiple Remote Data Stores
There may by times when you wish to sent the results of a query to more than one remote data store. In order to assign more than one remote data store to a query’s schedule:
-
Click the Remote Data Store dropdown to expand it.
-
Navigate to the desired remote data store listing.
-
Select the desired remote data store so that it is displayed in the Remote Data Store dropdown’s field.
-
Expand the Remote Data Store dropdown again.
-
Navigate to the next desired remote data store listing and select it.
-
Repeat until you have selected all of the required remote data stores.
Note: In order to delete a remote data store listing, click on the X beside the data store’s name.