Orbital Queries
Queries are the means by which Orbital searches for malicious activity on an organization’s endpoints. To accomplish this, Orbital uses osquery as its query engine and SQL as its query language.
Orbital makes use of osquery’s stock tables in addition to Orbital-specific tables. The results returned through Orbital can be sent to other applications, such as Secure Endpoint™, Secure Malware Analytics™, and SecureX Threat Response™, and can be stored in remote data stores (RDS), such as Amazon S3™, Microsoft’s Azure™, and Splunk™.
Use the Orbital Investigate page to construct and execute live, live queries on endpoints in order to gather more information from them. Orbital uses osquery, which allows you to query your devices like a database with basic SQL commands.
There are two basic problems to solve when managing data: storage, and retrieval. Storing your data should be quick and easy, and it should also be quick and easy for you to query the information you need from the tons of data you don’t. SQL (Structured Query Language) is an industry-standard language that allows you to create and maintain databases and to retrieve requested data from them when needed. It is a powerful and flexible tool for working with relational databases, and is used by Oracle, Sybase, Postgres, MS Access and countless other database systems.
osquery uses SQL and the relational data model to describe a device, by presenting an entire operating system as a high-performance relational database. Orbital uses osquery in order to provide you and your applications with detailed information about your endpoints. osquery allows you to write SQL queries to explore operating systems and device data. Orbital can be used by Cisco products to query endpoints and by Cisco customers to use osquery wherever they have Orbital deployed.
This topic provides a high-level introduction to SQL to be used as a foundation for working with Orbital. It is not intended to be a full tutorial.
About SQL
Most actions that need to be performed on a database are done with SQL statements, including querying the data, data manipulation (insert, update, and delete), data definition, and data access control.
Orbital was developed to support SQL users of every level, from novice to expert. You do not need to know how to write SQL statements in order to use Orbital effectively. However, you will quickly want to learn more once you begin to appreciate its power.
SELECT Statement
One of the most common SQL statements is the SELECT statement. To find information stored in a relational database using SQL, you simply tell the system what you want to know written in the form of an SQL SELECT statement.
The SQL SELECT statement selects data from a database, using clauses (such as FROM and WHERE) to specify criteria or parameters. Client programs send SQL statements to the server, the server processes the statements and returns the results to the client program.
The most basic SELECT statement syntax looks like this: SELECT * FROM table_name;
- The asterisk (
*) is used as a wildcard. - White space is ignored.
- SQL statements are case-insensitive but there’s an industry standard of putting the commands into all caps.
Here is a simple example:
SELECT column1, column2 FROM table1, table2 WHERE column2='value';
In this example, column1 and column2 are the field names of the table from which you want to select data from. To select all fields available in the table, use the following syntax: SELECT * FROM table1;
Types of Orbital Queries
Orbital provides two types of queries, custom queries and scheduled queries. These query types are defined in the subsections below.
Custom Queries
Note: Custom queries are also know as live queries or as probes.
The point of a custom query is to allow you to iterate and test quickly. Custom queries are queries that are run immediately and will have the results returned as soon as they are available from the node. These results are listed in the Results pane; however, they can also be viewed on the Results page.
Additionally, they only return one set of results for any endpoints that meet the query’s criteria. This means that if a targeted endpoint is offline, it will not be queried and there will be no results returned for that endpoint.
Scheduled Queries
Scheduled queries are those queries that been assigned both a window of time in which it must execute and a frequency of when it will execute. For example, a query is given an execution window of 24 hours and a frequency of 15 minutes. This means that the query will actively run and collect results for a period of 24 hours after its execution has been started and that it will attempt contact each relevant endpoint and run the query every 15 minutes.
Scheduled queries are most useful for developing a picture of a node’s history over the query’s window of time.
Refer to Schedule Orbital Queries for a more complete description of what scheduled queries are.
Query Prefixes
Orbital can make use of query prefixes to specify the endpoints that the query will run against, whether the they are specifically identified or match a set of criteria. Query prefixes can be grouped into three categories, Special, Dynamic, or Static.
Special Prefixes
This prefix category currently contains only one prefix, the all prefix. If you type all into the Endpoints field of the Query page, it will force Orbital to search across all endpoints in the organization. Additionally, all cannot be used in conjunction with other prefixes, nor can it be used with the allowos filter.
Dynamic Prefixes
This prefix category consists of those prefixes where a set of search criteria has been specified. Providing any criteria for one or more of these dynamic prefixes will cause the query to be run against all endpoints that match the criteria specified by the prefix. Unlike static prefixes, any endpoints that match the prefix criteria, that are not online, will be included in the query once they have reconnected, until the query expires.
Static Prefixes
This prefix category consists of those prefixes that directly specify one or more known endpoints to run the query against. These prefixes can directly specify the endpoint or endpoints to query, or they can contain a wildcard (%) to specify a group of endpoints.
Note: All prefixes that use the wildcard character (%) will be treated as a dynamic prefix.
Any static prefixes that either refer to unknown endpoints or endpoints that are not connected at the time the query has begun will have the specified endpoints dropped from the query. If an endpoint has been dropped from the query, it will not be queried if it reconnects to the network, during the query’s execution.
Refer to the Query API’s Prefix Table for more information on Orbital’s query prefixes.
The all Prefix
The all prefix is used when defining which endpoints will be included in a query. Using this prefix will force Orbital to run the query against all of an organization’s endpoints.
The prefix can be used in conjunction with the Operating System Filter (![]() ) to narrow down the number of endpoints that the query will be run against. For example, if you set the the Operating System Filter to include only Mac endpoints, the
) to narrow down the number of endpoints that the query will be run against. For example, if you set the the Operating System Filter to include only Mac endpoints, the all prefix will run the query across all macOS-based endpoints in an organization.
Caution: Care should be taken when using this prefix, as it has the potential to seriously impact Orbital’s performance.
The allowos Filter and the Orbital Query Catalog
allowos is a filter that is used to specify which operating system must be running on an endpoint before the query will run against it.
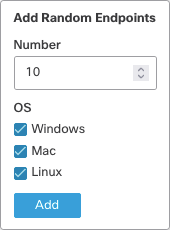
The allowos filter can be used with queries stored in Orbital’s SQL Query Catalog. Because allowos influences the endpoints that will run the query, it is defined along with the endpoints, either by typing the value in the Endpoints field or defining it in the Operating System Filter popup, shown in the figure below.
The SQL Query Catalog contains queries that should only be executed on endpoints running a specific operating system. For example, a query that searches through the Windows registry cannot be run on endpoints using macOS or Linux.
The allowos filter returns only the endpoints that are running the desired operating system. For example, if you run the query Apple System Log (ASL) System Events Monitoring, Orbital will run it against all endpoints specified in the Endpoints field, irrespective of OS. Since some endpoints queried may be running Windows or Linux, specifying that you only want macOS (allowos:mac) endpoints returned is a way of ensuring that you will receive accurate results.
Query Success
A query will be considered successful provided that at least one of the following conditions is met.
- The query contains the
allspecial prefix, a dynamic prefix, or at least one resolvable static prefix. - At least one static or dynamic selector is able to be resolved if some or all of a query’s static prefixes fail to resolve to known endpoints.
- While
queryid(for linked queries) is a dynamic prefix, each prefix value must refer to a known query at the time of the request or the request will fail.
The allowos filter returns only the endpoints that are running the desired operating system. For example, if you run the query Apple System Log (ASL) System Events Monitoring, Orbital will run it against all endpoints specified in the Endpoints field, irrespective of OS. Since some endpoints queried may be running Windows or Linux, specifying that you only want macOS (allowos:mac) endpoints returned is a way of ensuring that you will receive accurate results.